What "Running" Actually Means (and Why It Costs So Much)
When your toilet runs, water flows continuously from the tank into the bowl — either as an audible trickle or a silent leak you only notice when dye appears in the bowl 15 minutes after you drop food coloring in the tank[3]. That constant flow means your fill valve keeps refilling the tank, cycling water nonstop.
The numbers add up brutally fast.
A moderate leak wastes 30 gallons per day. A bad flapper can push that to 200 gallons[3] — about what you'd use in six full showers. In Phoenix, where water and sewer charges climb steeply above baseline usage, that extra volume often doubles or triples the waste's cost impact.
Running Toilet Water Waste at a Glance:
- Minor leak: 30 gallons/day = ~900 gallons/month
- Moderate flapper failure: 100 gallons/day = ~3,000 gallons/month
- Severe leak: 200 gallons/day = ~6,000 gallons/month (equivalent to six daily showers)
- Average cost impact in Phoenix: $60-$200+ per billing cycle depending on severity
- Most leaks go unnoticed for 4-8 weeks before homeowners investigate
The most frustrating part? The issue typically starts as a barely-audible trickle[1][3], so homeowners ignore it for weeks or months before the bill forces action. By then, you've flushed hundreds of dollars down a drain that never stops draining.
The Flapper: The Most Common Culprit
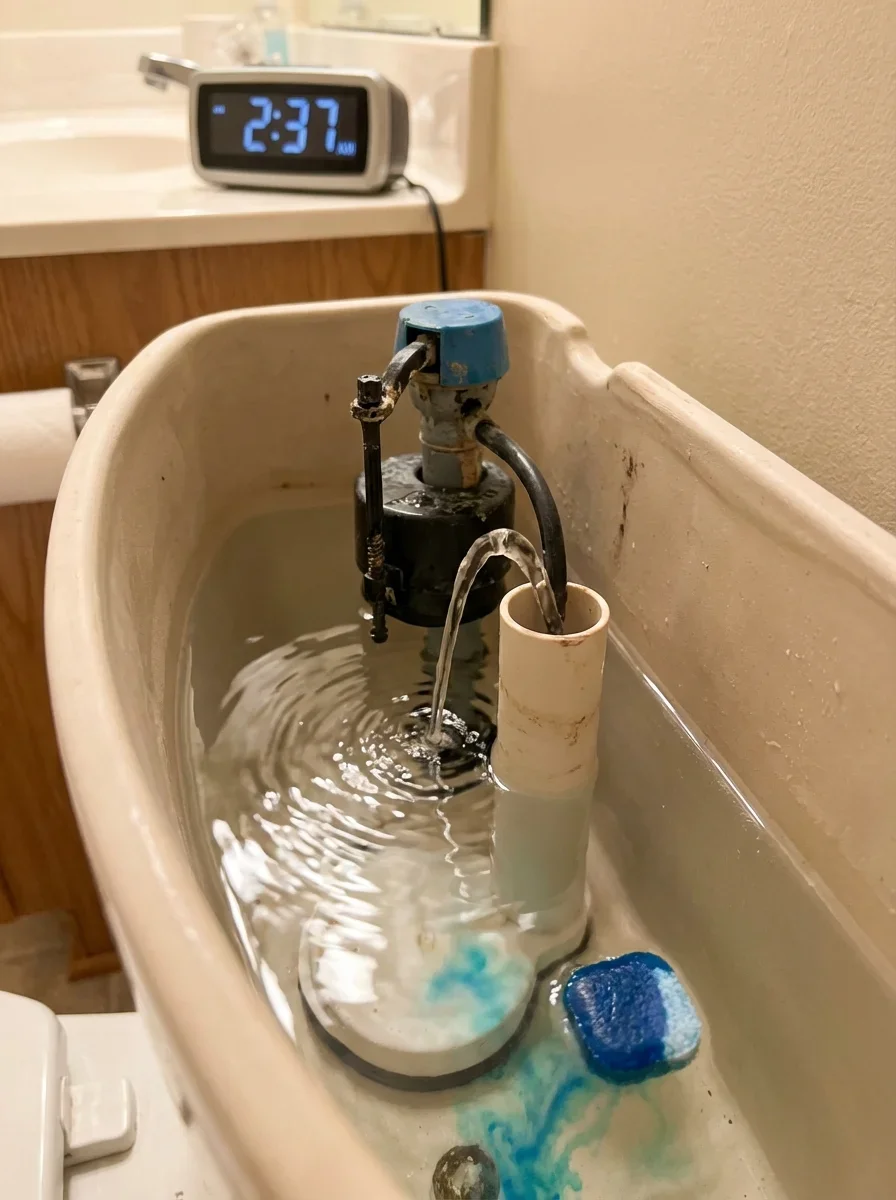
The flapper is a rubber or silicone seal at the bottom of your tank. When you flush, it lifts to release water into the bowl, then settles back to seal the opening. Over time — usually 3 to 5 years[3] — it warps, cracks, or builds up mineral deposits that prevent a tight seal.
In Arizona's very hard water (300+ ppm calcium carbonate), that timeline shortens. Calcium deposits form crusty rings around the flapper seat, even if the flapper rubber itself looks fine.
The result: water seeps past the seal constantly, and the fill valve kicks in every few minutes to top off the tank.
Testing the Flapper
Drop a few drops of food coloring into the tank. Wait 15 to 20 minutes without flushing[3].
If color appears in the bowl, your flapper leaks.
This test catches silent leaks — the ones that cost you money without the tell-tale hiss. You might never hear the problem, but your water meter sees it.
Replacing the Flapper
Turn off the water supply valve behind the toilet. Flush to empty the tank, holding the handle down to drain as much as possible[1][2]. Unhook the old flapper from the chain and the mounting ears on the overflow tube.
Take the old flapper to the hardware store — there are dozens of models, and you need an exact match for your flush valve brand[2][4]. Install the new one, making sure the chain has about ½ inch of slack when the flapper rests closed[2][4]. Too much slack and the chain tangles. Too little and the flapper never fully seats.
Turn the water back on, let the tank refill, and test.
No color in the bowl after 20 minutes means you're fixed.
The Fill Valve and Float: When Water Won't Stop Filling
If the tank keeps filling past the overflow tube — or never stops filling at all — the issue is usually the fill valve (the tall assembly on the left side of the tank) or the float mechanism that tells it when to shut off.
Older toilets use a ball float on a metal arm. Newer models use a cylindrical float that slides up and down the fill valve itself. Either way, the logic is the same: as water rises, the float lifts and triggers a shutoff valve.
If the float is set too high, water spills into the overflow tube, creating the classic running sound[4]. If the shutoff valve fails, water never stops.
Adjusting the Float Height
Most modern fill valves have a simple screw adjustment. Turn it clockwise to raise the float (and water level), counterclockwise to lower it[5].
Your target: water should sit about 1 inch below the top of the overflow tube.
On older ball-float systems, you'll bend the metal arm downward slightly to lower the shutoff point. Be gentle — metal fatigue can snap the arm, forcing a full fill valve replacement.
When the Fill Valve Itself Fails
Hard water clogs the diaphragm or seal inside the fill valve, preventing complete shutoff. You might hear a faint hiss even when the float is in the correct position.
Sediment buildup is common in Arizona homes with untreated municipal water — the calcium that furs your showerheads also gums up toilet internals[1][3].
You can try cleaning the valve. Shut off water, remove the top cap, flush debris, reassemble. If that doesn't stop the flow, replace the entire fill valve assembly. Most big-box stores carry universal kits that fit standard tanks. Installation takes 15 minutes and requires only an adjustable wrench.
The Flush Handle and Chain: Small Parts, Big Annoyances
A stuck or loose handle is a minor irritation that turns into a daily habit: you jiggle it partway down every time you flush[4]. Eventually, the handle mounting nut loosens completely, or the internal arm cracks from repeated stress.
Chain Tangles and Length Issues
If your chain is too long, it pools under the flapper and prevents a full seal. If it's too short, it holds the flapper slightly open, causing a constant trickle.
Check for tangles first[1][4] — twist the chain to straighten kinks, then adjust the hook position on the handle arm to leave that ½-inch slack.
If the chain is metal, it may corrode over time. Replace it with a stainless or plastic-coated chain from the hardware store. They cost under $3 and solve 90% of chain-related running issues.
Handle Replacement
Most toilet handles use a reverse-thread mounting nut — turn it clockwise to loosen, counterclockwise to tighten. If the handle itself is cracked or the internal lever arm is bent, replace the entire assembly.
Bring the old handle to the store to match the finish and mounting style.
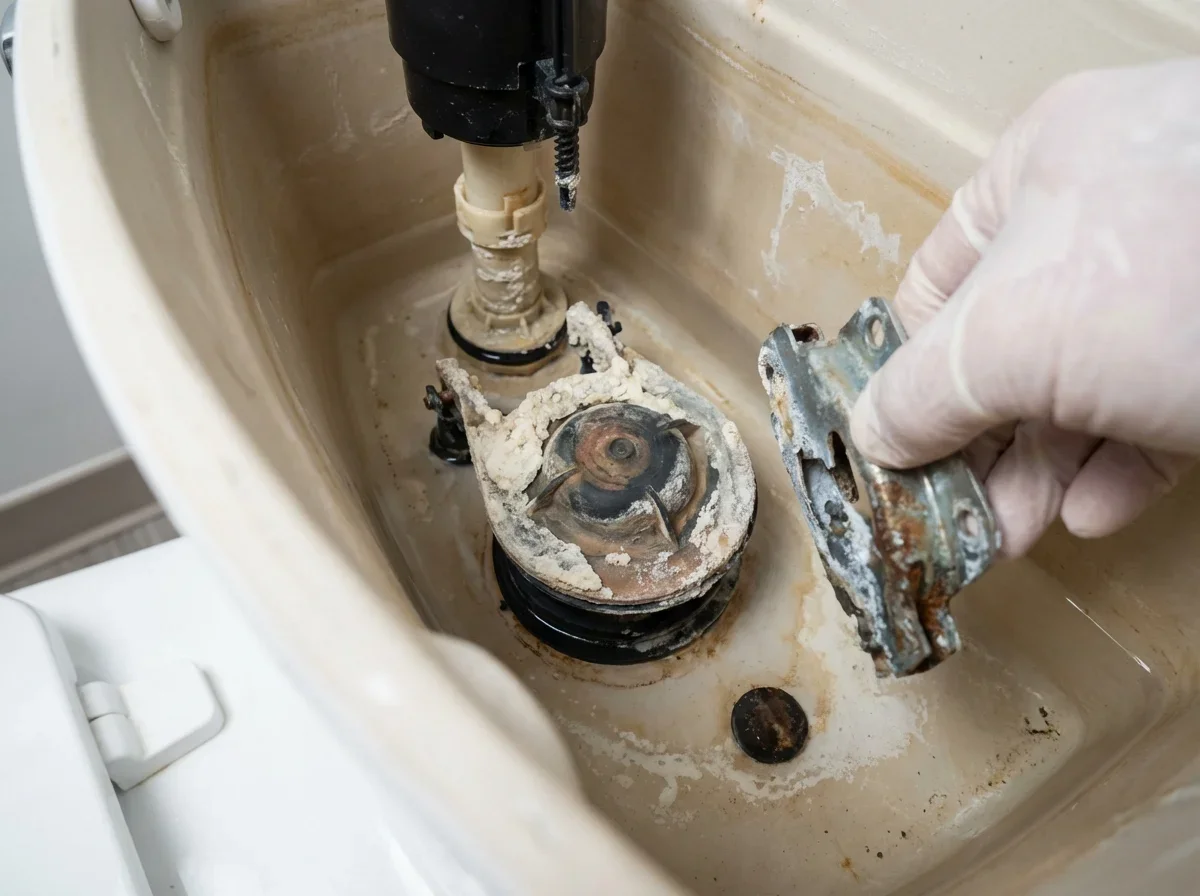
Hard Water's Role in Accelerated Failures
Phoenix's hard water (300+ ppm calcium carbonate) is the silent accelerator behind nearly every toilet component failure. Mineral deposits coat the flapper seat, clog fill valve ports, build up on the float mechanism, and even create crusty rings inside the overflow tube that alter water flow dynamics.
Homes without a water softener will see flapper lifespans drop from 5 years to 2-3 years. Fill valves that should last a decade may fail in 4-5 years.
The sediment isn't just cosmetic — it changes how parts seal, pivot, and shut off water.
If you're replacing the same toilet parts every 18 months, hard water is the root cause. Either install point-of-use softening (whole-house systems are ideal but expensive) or commit to more frequent inspections and part swaps. Waiting for total failure means wasting water for weeks before the problem becomes obvious.
| Component | Normal Lifespan | Hard Water Lifespan | Failure Signs | Replacement Cost |
|---|---|---|---|---|
| Flapper | 5-7 years | 2-3 years | Food coloring test fails, constant refilling | $4-$12 |
| Fill Valve | 8-10 years | 4-5 years | Hissing sound, won't shut off, mineral buildup | $15-$30 |
| Flush Handle/Chain | 10+ years | 6-8 years | Sticking, loose nut, corrosion | $8-$20 |
| Wax Ring Seal | 20-30 years | 15-20 years | Water at base, sewer smell | $50-$150 (with labor) |
When DIY Becomes a Plumber Call
Most running toilets are DIY fixes if the problem is a flapper, chain, or simple float adjustment. But some scenarios require professional help.
In Arizona's slab-on-grade construction, ignoring those signs can turn a $150 repair into a $3,000 disaster.
Cracks in the Tank or Bowl
If you see hairline cracks in the porcelain — especially around the tank bolts or near the base — stop using the toilet immediately. Porcelain cracks propagate under pressure.
A slow seep today becomes a catastrophic flood tomorrow, dumping 5 gallons per minute onto your floor and into the slab.
Arizona's extreme temperature swings (106°F summer days, 40°F winter nights) stress porcelain more than moderate climates. Thermal expansion and contraction create micro-fractures over decades, particularly in pre-1990 toilets with thinner walls.
Cracked toilets require full replacement. Don't attempt to patch or seal — the structural integrity is gone. A licensed plumber can swap the unit in 2-3 hours, including hauling away the old fixture.
Corrosion at the Fill Valve or Tank Bolts
If rust or white calcium buildup has fused tank bolts to the porcelain, or if the fill valve threads are so corroded you can't remove the mounting nut, you're looking at forced removal that may crack the tank. Professional plumbers have the tools and experience to heat, cut, or chemically loosen seized fittings without destroying the toilet.
Tank bolt corrosion is common in Arizona because humidity from the tank condensation combines with mineral-laden water to create the perfect oxidation environment.
Once corrosion starts, it accelerates.
Base Leaks and Wax Ring Failures
If water pools around the toilet base after flushing — or if you notice a sewer smell near the toilet — the wax ring seal has failed. This isn't a "running toilet" issue in the traditional sense, but homeowners often conflate the two because both involve water and the toilet.
Wax ring replacement requires lifting the entire toilet off the floor bolts, scraping the old wax, installing a new ring, and re-setting the bowl with precise pressure to create a watertight seal. Get it wrong and you'll leak sewer gas (or worse, wastewater) under your floor.
In slab homes, that means potential damage to subfloor framing and drywall in adjacent rooms.
Professional toilet repair and installation services handle wax rings, flange repairs, and full replacements daily. The cost difference between DIY disaster and professional precision is worth it when you're dealing with a sealed slab foundation.
The Tank Lid Warning Nobody Mentions
Here's something homeowners wish they'd known[2]: toilet tank lids are fragile, expensive, and nearly impossible to replace with exact matches if you break yours during a DIY fix.
They crack easily if bumped against tile, dropped on the floor, or set down too hard on a countertop. And because manufacturers change lid molds every few years, finding a replacement for a 10-year-old toilet often means buying a universal lid that doesn't quite fit or ordering a custom porcelain piece that costs $80-$150.
When you remove the lid, set it on a folded towel on a carpeted surface.
Never tile, never the bathtub edge, never balanced against the wall. Treat it like a dinner plate you can't replace, because functionally, that's what it is.
Preventive Checks That Stop Problems Before They Start
You can avoid most running toilet issues with a simple 5-minute inspection every 6 months[3]. Open the tank and check:
- Flapper condition: Look for cracks, warping, or mineral buildup on the rubber and the seat. If it feels stiff or crumbly, replace it even if it's not leaking yet.
- Chain slack: Ensure ½ inch of slack when the flapper is seated. Straighten any kinks.
- Float position: Water level should sit 1 inch below the overflow tube top.
- Fill valve sounds: Listen for hissing or gurgling when the tank is full and idle. Any sound means water is moving when it shouldn't be.
- Tank bolts and washers: Check for rust, corrosion, or wet spots around the bolts inside the tank.
Catching a degrading flapper 6 months before it fails completely saves you 10,000+ gallons of wasted water.
Tightening a loose tank bolt before it cracks the porcelain saves you a $400 toilet replacement.
Cost Context: DIY vs. Professional Repair
A replacement flapper costs $4-$12. A new fill valve runs $15-$30. A complete handle assembly is $8-$20.
If you're comfortable with basic tools and can follow the steps above, you'll spend under $50 and an hour of your time to fix most running toilets.
Professional service calls for toilet repairs typically run $150-$250 in Phoenix, including parts and labor. That's worth it if you're dealing with corroded bolts, cracked tanks, or wax ring failures — problems where inexperience causes expensive mistakes.
For perspective, wasting 100 gallons per day for two months (a moderate flapper leak left untreated) adds roughly $60-$80 to your combined water and sewer bill in Phoenix. That's about half the cost of a professional repair call.
Wait six months and you've spent more on wasted water than you would have on a plumber.
When Hard Water Demands a Bigger Solution
If you're replacing toilet flappers annually, clearing mineral buildup from fill valves every 18 months, and dealing with crusty deposits on every fixture in your home, the problem isn't the toilet.
It's your water.
Arizona's hard water doesn't just affect toilets. It scales water heaters, clogs aerators, spots glassware, and accelerates corrosion in copper supply lines (common in pre-2000 Phoenix homes). Installing a water softener or whole-house filtration system eliminates the root cause.
Softeners run $800-$2,500 installed, depending on capacity and features. That sounds steep until you calculate the cumulative cost of replacing flappers, faucet cartridges, showerheads, water heaters, and dealing with slab leaks caused by accelerated pipe corrosion.
The payback period is typically 3-5 years, and the reduction in maintenance headaches starts immediately.
Arizona Homeowner Pro Tip: If you're on a well with untreated hard water, expect to replace toilet flappers every 18-24 months regardless of quality. The calcium concentration in some Phoenix-area wells exceeds 400 ppm — nearly double the municipal supply. At that hardness level, even premium silicone flappers calcify faster than standard rubber ones fail in soft water regions.
Arizona-Specific Considerations

Phoenix's slab-on-grade construction means your toilet sits directly on a concrete foundation with plumbing lines running underneath. There's no crawlspace, no basement access.
If a toilet leak migrates under the slab and saturates the caliche soil beneath, you're looking at foundation settling, cracked tiles, and moisture wicking into drywall.
That's why catching running toilets early matters more here than in regions with raised foundations. A slow leak in a basement-built home drips into a sump. A slow leak in a Phoenix slab home creates a subsurface moisture problem you won't see until the damage is structural.
Additionally, Arizona's Registrar of Contractors (ROC) requires all plumbers performing work over $1,000 to carry an active license (verify at roc.az.gov). For simple toilet repairs under that threshold, handymen and non-licensed techs can legally do the work — but they won't carry the insurance or warranty backing that ROC-licensed professionals provide.
If a $200 repair causes a $5,000 flood, licensing and insurance matter.
The Six-Month Inspection Habit
Set a phone reminder for every March and September: "Check toilets." Five minutes per toilet, twice a year, catches 90% of problems before they become expensive.
You're not looking for perfection. You're looking for changes.
Flappers that feel stiffer than last time, fill valves that hiss when they used to be silent, water levels that have crept higher toward the overflow tube.
Toilets fail gradually, not suddenly. The flapper doesn't go from perfect seal to gushing leak overnight. It degrades over months, wasting a gallon a day, then five, then fifty. Catching it in the early stages — when it's a $6 part and 10 minutes of work — beats catching it when your water bill has spiked $200 over a summer.
Why the Jiggle-Handle Habit Is a Red Flag
If you've trained yourself to jiggle the handle after every flush to stop the running, you're not fixing the problem — you're accommodating it[4]. That habit means something is wrong: the chain is tangled, the flapper isn't seating, the handle mechanism is loose, or the flush valve itself is worn.
Every jiggle is a reminder that water is wasting and parts are degrading.
The fix takes 5 minutes — adjust the chain, tighten the handle nut, or replace the flapper. Once it's done, you'll never think about it again.
Homeowners tolerate the jiggle habit for months or years because it "works." But it doesn't work. It postpones the repair while wasting water every single day in between.
What Food Coloring Actually Tells You
The food coloring test[3] is the single best diagnostic for silent leaks — the ones that don't hiss, don't make the tank refill audibly, and don't announce themselves until your bill arrives.
Drop 10-15 drops of any food coloring into the tank. Don't flush. Wait 15-20 minutes. Check the bowl.
If you see color, water is seeping past the flapper continuously, even if you can't hear it or see ripples in the bowl.
This test works because it traces the water path. No color in the bowl means the flapper seals. Color in the bowl means you're wasting water 24/7, likely 30-100 gallons per day depending on leak severity.
Run this test every six months on every toilet in your home. It takes 30 seconds of effort and catches leaks that would otherwise go unnoticed until the cumulative waste hits triple digits on your bill.